Harry Potter ANIMAL TRANSFORMATION Tutorial for After Effects
- Видео
- О видео
- Скачать
- Поделиться
Harry Potter ANIMAL TRANSFORMATION Tutorial for After Effects
65, 394 | 4 год. назад | 2, 792 - 0
► My Top 10 Tips for making your best film on a budget:
This fun effect is based on what you see in the Harry Potter films where a "Animagus" human magically transforms into an animal (or an animal into a human) - good examples are at Hogwarts School when Professor McGonagall (Maggie Smith) transforms into a cat - surprising Harry and Ron when they are late, Professor Lupin (David Thewlis) becoming a werewolf and fighting Sirius Black, and Peter Pettigrew or Wormtail (Timothy Spall) transforming into Scabbers the rat.
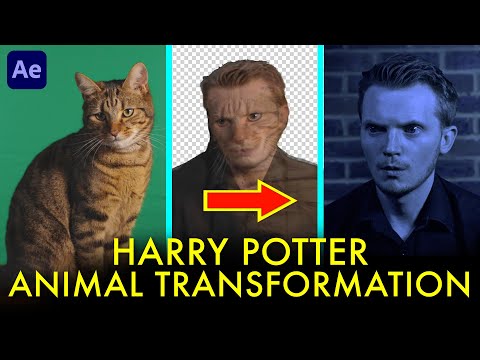
In the films they likely have used CGI animals for the shot where they transform to get the precise movements they wanted, and 3D animation to blend or morph the human together with the animal for the transformation. But I tried the 'no-budget' approach - using a real animal (my cat Alfie) a green screen and Adobe After Effects!
You need to film your animal and human using a green or blue screen to add a clean background later. Now we were just using my cat Alfie for this, and he is not trained to act or appear on camera in any way, so my plan was simply to film the cat first to see what we would get that we could use. This is because it would be easier for me to copy the cat than try and get the cat to copy me. I thought it would also be easier to start the shot with the cat and have him turn into me rather than the other way round. In the end after several takes, we got Alfie to sit still in the same place facing the camera, and got a nice moment of turning his head a little. For part two I tried to copy the rough position the cat had been in. Then I ‘acted’ the end of the transformation, looked a round a little but as if I’m checking to see if anyone had seen me, and then I just exit the frame. Thirdly we just needed a clean background to put behind both figures, and it was time fire up Adobe After Effects.
So the first thing to do is to line up the two main shots on top of each other, If it’s easier you can parent one layer to the other - I parented the cat’s layer to the human layer so that it would stick to it and move in exactly the same way. Another thing that will probably make the change easier is to actually freeze the frame using time remapping. Now you can go ahead and remove the green screens from both shots using the Keylight effect. f the edges of the background are still visible, to get rid of these you can use the pen tool and draw masks around just the parts of the shots that you want to see.
Next add the Mesh Warp effect to both layers. You can now add a keyframe under Distortion Mesh at the beginning and the end of the section where we want the change to happen. So first we want to make the cat change into the shape of the human over time. So if we leave the first keyframe as it is, we can go to the end one and begin to distort the cat to make it line up with the shape of the human. And you can do that by pushing and pulling the corners of the squares around. And now we can do the same process with the human, but in reverse. Set two key frames, one at the beginning and one at the end, and this time we're going to leave the ending one alone, and we can distort the beginning of the human to look like the cat. So once you've changed everything on both layers, you can now keyframe the opacity of the human layer, which remember is the one on top, to start at 0% and end up at 100%. This will slowly make the cat layer underneath disappear, and as long as you’ve lined your edges up, it won’t be seen at the end because it will be covered completely by the human layer. And that is basically how you can do a morph effect between an animal and a human!
My After Effects Essentials mini-course is now live over at diymoviemaking.com - it's 30 video lessons to get a complete beginner up and running quickly with the program Adobe After Effects to get results like I do in my VFX work, and it even comes with a downloadable selection of my footage to practice with - learn more here:
Get unlimited Stock Footage from Artgrid and get 2 extra months with our link: ►
Get unlimited music for your videos on Artlist and get 2 extra months with our link: ►
Sign up to ProductionCrate for free or paid membership to access their amazing library of assets: ►
Чтобы скачать видео "Harry Potter ANIMAL TRANSFORMATION Tutorial for After Effects" передвинте ползунок вправо
- Комментарии
Комментарии ФБ